Archive for the ‘dessert’ Category

Breakfast Cookies

November 18, 2012

Here’s the thing; I don’t like to eat breakfast.

Don’t get me wrong; I LOVE breakfast food.  I mean, come on; bacon!  Hello?  French toast, waffles, hash browns, scrambled eggs, omelets; there’s really very little about breakfast food that doesn’t appeal to me.  My problem with it, though, is that its served so early in the morning.  If I can eat breakfast at 10 am, that would suit me just fine.

I shouldn’t wait that long to eat, though, and because I’m trying both to be healthier and to set a better example for my daughters, the quest to find something that I’m willing to stomach in the wee hours took on some serious focus a few months ago.

I went looking for some form of baked oatmeal – something that could be made ahead and stored (to eliminate the “I don’t feel like making anything” excuse) and which could be eaten on the go (because, while I personally don’t have a whole lot of time constraints in the mornings, my daughters do not always rise early enough to allow themselves leisurely mornings).  After messing with a couple of different recipes, I’ve managed to Frankenstein together something that I really like.

Start with half a cup each of honey, peanut butter (I use smooth and all-natural, but whatever you like is perfectly acceptable) and apple sauce (you can sub bananas for the apple sauce, but I’m not a big banana fan, so I don’t).  I drop in a blop of vanilla here, just because I can.  Mix these together in a large-ish bowl until they’re well combined.

Into that, drop a cup of old-fashioned oats, half a cup of flour (I use whole wheat white flour for this application), a quarter cup of dry milk powder, and  a quarter teaspoon of baking soda (you can sift these things together if you’re fussy enough to need to do that, or if your milk powder is lumpy).

After that, the world, as they say, is your oyster; add in whatever suits your fancy.  Like nuts?  Drop some in there!  Cinnamon and nutmeg?  Why the hell not?  If you’re a raisin kind of person, I say have at it.  My personal preference is for a handful each of chocolate chips and dried cherries, but that’s just me.

Drop the batter in generous lumps  – like, a quarter of a cup – onto a baking sheet lined with parchment (or silpat; I love that stuff) and park the pans in a 350° oven for about 10-15 minutes; you want them cooked, but not dry.  Let them cool, pop ’em in an airtight container, and keep ’em on your counter.  One of these and a nice glass of milk should hold you over until lunch (and they make completely acceptable after-school snacks, too).

Enjoy!

(pictures to follow…)

Nutella Bread Pudding

August 17, 2012

We invited the gentleman who owns the cottages we rent at the lake to dinner last night.  At Mr. Chili’s request, I put together a recipe of lemon chicken picatta (which turned out particularly lovely), but I was stumped over what to make for dessert.

It’s summertime, and that usually means fruit or ice cream for after-dinner sweeties around here.  I wanted something a bit more impressive, though, and as I mused over the possibilities, my eyes rested on a box of mini croissants and a jar of Nutella sitting on the counter.

Bingo.

Here’s how you do it.  Preheat the oven to 350° and break out a dish – I use a souffle dish, but you can use a loaf pan or a cake pan or pretty much anything that’s of sufficient size for your pudding.  Split croissants (day-old or older is better; I’d bought this box on Monday and cooked the pudding on Thursday) and slather them with a generous swath of Nutella and put the tops back on.  Once you’ve got them all sandwiched together, cut them into chunks – my mini croissants worked perfectly cut into halves; I would imagine that standard sized pastries would need to be cut into thirds or quarters – and arrange them in the dish, jigsaw-puzzle wise.

In another container (I use my measuring cup), whisk a half cup of powdered sugar with a cup of cream (the original recipe calls for heavy cream, but I almost never have that to hand; I have perfect success with half and half), two eggs, and a healthy shot of vanilla.  Pour this over the croissants and let the whole thing sit for about half an hour.  I cover the top in parchment, then put on a layer of foil and put something moderately heavy over the whole, just to encourage the little sandwiches’ soaking up the liquid.

When you’re ready to bake, cover the dish in foil and park it in the oven for about half an hour, then take off the foil and let it go another ten minutes.  I leave the pudding to cool on the counter for about 20 minutes before I serve it; you want it warm, but not rocket hot.

This is gorgeous just as it is, but it doesn’t suffer one bit from a splash of cream.  Nor, I imagine, would a scoop of ice cream or a splot of whipped cream go amiss, either.  During the holidays, I swap out the cream with vanilla egg nog (leave out the sugar if you do this; you won’t need it) and it’s perfect.

You’re welcome.

Chocolate Zucchini Bread

August 13, 2012

It’s that time of year again!!


I love zucchini.  My beloved, however, does not.  It’s one of his ‘weird’ foods; he objects to the texture (and, to be fair, his mother ruined all forms of squash for him when he was a kid; what IS it about some people that they insist on cooking the stuff in ways that render it more like warm snot than the yummy vegetables they are?!).

My friend and neighbor grows the stuff, though, and is generous enough to share her harvest with me.  I’ll dice it in my salads to eat it raw, I’ll saute it with some butter as a side dish (for me; I’m the only one who’ll eat it.. more for me!) and I’ll ask Mr. Chili to grill it (he’s not so grossed out that he won’t deign to touch the stuff….).  One of my favorite things to do with zucchini, though, is to turn it into chocolate yumminess that everyone, regardless of their feelings about the stuff, will gleefully consume.

Start by grating your zucchini.  Most of the recipes I’ve found recommend peeling the veggie first, but I never bother with that; didn’t our grandmothers always tell us that all the good stuff is in the skins?  You’ll need two generous cups, give or take.  Set that aside while you preheat the oven to 350° and grease two standard loaf pans or paper two dozen cupcake/muffin tins.

In a bowl, beat 2 cups of sugar with a cup of vegetable oil, three eggs, and three teaspoons of vanilla (you’ve met me, right?  I never measure vanilla; just drop a healthy shot into the bowl and call it even).  In another bowl, sift together 2 1/2 cups of flour, a half cup of cocoa powder (I always make this a rounded measure), a half teaspoon of baking powder, and a teaspoon each of salt and baking soda.  A lot of these sorts of recipes call for a teaspoon of cinnamon, but I always leave that out; feel free to include it if the fancy strikes  you.  Most recipes DO NOT call for a healthy handful or two of chocolate chips, but chocolate chips make everything better, so there.

Add the dry bowl to the wet bowl, stirring until just combined, then dump in your grated zucchini and chocolate chips and stir those around.  Divide the mess into the loaf pans and park them in the middle of your oven for about 45 minutes or spoon it into the muffin tins and bake for about 22-25 minutes (the toothpick test is reliable here).  Make sure you let them cool for about 10 minutes or so after coming out of the oven before you try to take them out of their pans; they need a bit of solidifying time.

We love this stuff straight up, but Punk discovered last year that it’s particularly good toasted with a bit of cream cheese frosting on it; I was making carrot cake and had some extra frosting.  Don’t even get me STARTED on the Nutella….We joked that the Chili women really know how to negate ALL of the nutrition in a recipe!

Enjoy!

Creme Brulee

December 24, 2011

I have a love-hate relationship with custard.

As a high school student enamored of kitchen art, I took every home ec. class I could cram into my schedule.  I was a whiz at recipes, and I always did exceedingly well in the classes.

That is, until we got to custard.

I failed custard, miserably and repeatedly.  I would follow the recipes to the letter, but invariably I’d be left with weeping, split, inedible messes.  What’s more is that I didn’t give up after my first couple of disasters.  No; I was damned and determined that I wasn’t going to let this process get the better of me, so I marched doggedly back into the high school kitchen lab to try again.

And again.  And again.

Eventually, my teacher put her hand on my shoulder and told me that I should let this fight rest and move on to other skills (I think she was starting to fret the number of eggs disappearing from the lab’s fridge).

I never really gave up on custard, but it was a very long time before I was willing to confront the process again.  I don’t know whether there was something in my teenage energy that was disrupting the natural order of custard or what, but I found that, now that I’m older, custard doesn’t present the same problems for me that it used to (and don’t discount the energetic theory, either; I used to stop watches, too).

So, here’s my go-to recipe, boosted with love and gratitude from Alton Brown.  Start by putting 4 cups of heavy cream, into which you should drop a split and scraped vanilla bean (and, if you have it, a little dash of Trader Joe’s vanilla bean paste), into a heavy bottomed sauce pan.  Set that to gently reach a boil over medium heat, then fish out the vanilla pods and set the pan aside to cool for about 15 minutes and put the kettle on.

While the cream is cooling and the kettle is heating, preheat your oven to 325° and get out the Kitchen Aid fitted with the whisk attachment.  Into the bowl goes a half a cup of sugar (I don’t level the measure) and six egg yolks, which get whisked together until the mixture starts to take on a light, lemony color.

While the mixer is running, pour the cooled cream in to the egg and sugar, whisking until it’s all nicely combined.  Pour the resulting liquid into 6 ramekins which you’ve put into a baking pan, pour the kettle into the pan so hot water comes to about halfway up the dessert cups, and park the baking pan in the middle of your oven for about 40 minutes.  The custards should be set, but still jiggly in the middle.  Remove the cups to the fridge to cool for at least two hours, but they can sit for a couple of days (cover them in plastic if they’re going to wait a while before serving).

The “brulee” part of creme brulee is just singed sugar.  If you’ve thought ahead and popped a vanilla bean in some sugar, use that; if not, plain sugar will work just fine.  Take the cups out of the fridge and let them sit at room temperature for a half hour or so before you sprinkle the tops with sugar.  Then, using a torch if you have one or the broiler if you don’t, heat the sugar until it just starts to caramelize (if you’re doing this under the broiler, DON’T LOOK AWAY!  Sugar goes from nicely browned to irretrievably burnt in the blink of an eye).  Give the cups a few minutes to cool again, then serve them to everyone’s delight.  The juxtaposition of the velvety custard and the crunchy sugar is sublime.

I’ve popped brulee’d cups back in the fridge and enjoyed them days later, but there’s a good chance you won’t have occasion to do that; these are too delicious to leave leftovers.

Oh, Fudge!

December 20, 2011

I’ve always been a fan of fudge.  Real, honest fudge, not that stuff that calls itself fudge but is really just condensed milk and marshmallow fluff.

The thing is, though, that the milk-and-marshmallow stuff got popular because it almost always works.  You see, baking and candy-making  involve science; if the conditions aren’t met, the product doesn’t work.  That’s why cakes fall and custards split and fudge seizes; something in the process or in the ingredients wasn’t quite right, and the whole thing goes to hell.

Here, though, is a recipe that is pretty consistent, once you get the technique down.  I’ve made several batches of this with round success (if we except the first attempt, when I tried to usurp the process by speeding the cooling, which resulted in the aforementioned seizure, so let’s not mention that, shall we..?).

Start with a heavy saucepan.  To that, add 2 cups of white sugar, 2 tablespoons of butter, and 1 tablespoon of corn syrup (it doesn’t seem like much, but remember what I said about science; the stuff’s in there for a reason).  Then, dump in 3 tablespoons of cocoa powder (I don’t level the tablespoons; the cocoa’s in there for flavor, not science) and a half a cup of chocolate chips.  On top of all that, pour 2/3 of a cup of cream (I’ve used half and half consistently with great success).  Give it a stir and let everything melt together over medium heat.

Once everything’s melted and smooth, get a pastry brush wet and brush down the sides of the pan to get rid of whatever is clinging there (SCIENCE!  Doing this keeps the sugar from re-crystallizing, and re-crystallizing is something you don’t want).  Clip a candy thermometer to the side of the pan, making sure the bottom of the thermometer doesn’t touch the bottom of the pan, turn the heat up to medium-high and leave it alone.  Don’t stir it, don’t swirl the pan, just leave it to happily bubble along.

Eventually – and it’ll feel like it’s going to take FOREVER to get there, but believe me, it will get there, so keep an eye on it – it’ll reach about 234° on the candy thermometer.  Once it does, take the pan off the heat and set it on a cooling rack – don’t stir it, don’t swirl it, and leave the candy thermometer where it is; you’ll want to check in on it periodically as it cools because you’ve got work to do when it settles down to about 110°.

While you’re waiting for the cooling to happen, get an 8×8 inch glass pan and butter it well.

Once your candy gets to 110°, take the candy thermometer out, get yourself a sturdy wooden spoon, and start stirring the crap out of it.  This is going to be a lot harder than  you expect, but that’s okay – just think of it as working off the calories you’re about to consume.  After about 5 or 7 minutes of furious stirring, your fudge will start to thicken and lose its glossy sheen; THAT’S when to pour it into the prepared pan, smooth it out with a spatula, and let it cool the rest of the way down (at this point, you can fridge it, but don’t try to speed the first cooling process by putting the pan in the fridge or on the back porch… trust me on this).

This really is a lovely recipe, and I hope you are as successful with it as I have been!

Quinoa Rice Pudding

January 29, 2011

I’ve lately been trying to make little changes that bring more healthy things into my diet.  I say “little changes” because I know myself, and I’m not likely to make the big changes stick, so I keep looking for ways to sneak substitutions and supplements into my routine that up my nutrition without making me feel deprived.

I’ve been hearing a lot about quinoa lately, so the other day I picked up a package in my local market.  It’s a little, tiny grain that one cooks much like rice.  My impression of the stuff is that it’s sort of like a cross between rice and couscous, with a little bit of oatmeal-y nuttiness to round the whole thing out.  It has a very mild flavor on its own and tends to take on the essence of whatever liquid it’s cooked in, and my first experiment with the stuff was to cook it in mushroom broth as a side for steak.  That went well, so I started thinking about whether or not it would work as a base for rice pudding.

It turns out that it CAN!  That is, of course, if you’re willing to overlook the fact that quinoa is a little more al dente than arborio rice and that, combined with the fact that quinoa doesn’t give off nearly as much starch as rice, means the whole texture of the dish is going to be entirely different.  I found the whole thing to be entirely satisfying, though, and I think this is a switch that is going to be very easy to make.

Start with a cup of quinoa.  Rinse this under cold water in a fine-mesh strainer and set aside while you get a cup and a quarter of milk (or any combination of milk/cream/half-and-half you desire) into a heavy bottomed saucepan.  To the milk, add a scant quarter cup of sugar (I always use a little less) and, if you’ve got one, a split and scraped vanilla bean (I didn’t have one, so I scooped in a little Trader Joe’s vanilla paste.  Nectar of the Gods, I’m telling you).  Put the pan over medium-high heat until it just starts to bubble (don’t let the milk scorch), add the quinoa, stir, pop a lid on and lower the heat to low.  Let the whole thing simmer, stirring occasionally, for about 15 minutes or so (that’s another benefit the quinoa has over the rice; it cooks much faster).

Like I said, this lacks the creamy luxury of rice pudding, but it packs a much greater nutritional punch, so I felt better eating it.  I think this was an entirely successful experiment!

Dark Chocolate Cheesecake

December 18, 2010

Also known as the “Oh, my GODDESS!” cheesecake.

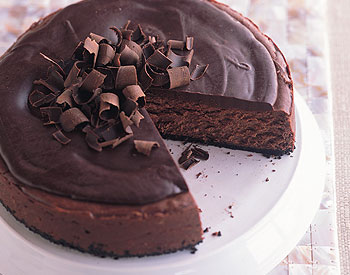
I haven’t actually made this yet, but I know for certain that I will.  Mr. Chili and I had the joy of sampling a bit of it while we were helping to cater the annual holiday party, and I left said party with the recipe and a significant portion of the leftovers.  Holy Mother of Godiva, but this stuff is gorgeous, and Mr. Chili has requested that it be a component of our Christmas dinner.  I live to make him happy, so here’s what I’ll do.

I’m going to blitz a package of chocolate wafer cookies into crumbs, mix them with a half a stick of melted butter, then press them into the bottom of a buttered, 9 inch springform pan and bake them for about five minutes in a 350° oven.  While that’s cooling, I’ll get on with the filling.

I’m going to get a little less than 10 ounces of the best bittersweet chocolate I can find (probably Scarfen Berger, and I know where I can find that) and chop it into melt-able bits, which I will then proceed to gently melt.  While that’s cooling a bit, I’ll mix four 8-ounce packages of soft cream cheese with 1 1/4 cups of sugar and 1/4 cup of good quality cocoa powder (also Scharfen Berger, if I can find some).  Then I’m going to add four eggs, one at a time, until each is incorporated.  Then I’ll mix in the lukewarm chocolate, pour it into the pan, and cook it for about an hour or until it’s done, then let it chill overnight.

As if that weren’t enough, I’m going to top it.  I’ll melt 3/4 cups whipping cream (no, really), 6 ounces of the wicked good chocolate, and 1 tablespoon of sugar in a medium saucepan until it’s smooth, cool it slightly, then pour it in the center of the cheesecake, making a gorgeous puddle of sublime yumminess.  That will chill for a bout an hour, then sit at room temperature for about an hour, and then it’s ready.

image credit

I fully expect that this will rival the prime rib in terms of died-and-gone-to-heaven delight.  I’ll report back…

Peanut Butter Cookies

November 1, 2010

I love peanut butter, and I always have.  I grew up with Skippy, but the truth is that I can’t stand the stuff as an adult- too much sugar.  I much prefer the less sweet (but not overtly salty) peanut butters, and the fewer ingredients, the better (and NO HFCS!).  I have always had an affinity for peanut butter and have found more and more ways to use it in my cooking (I have a recipe for a peanut chicken stir fry that I’ll include here some time later).  I love peanut butter so much, in fact, that I’ve been known to scoop up a blop of peanut butter with a cold piece of chicken and call it lunch (some of my coworkers look at me strangely when I do this, though – and one worried that I might be pregnant – so I try not to scare them too often with my weird lunch adventures).

I’ve always been fond of peanut butter cookies, but only as an occasional thing; for as much as I could just dip a spoon in the jar, peanut butter cookies have always been a once- or twice-a-year treat for me.  More than that, I’ll never eat a commercial peanut butter cookie (well, I will eat a Nutter Butter at the lake, but ONLY at the lake).  Peanut butter cookies have to be home made; anything else is strikes me as vaguely nasty and literally leaves a bad feel in my mouth.

I’ve had this cookie recipe for years; to be honest, I’m not sure where I got it – it could have come from my biological family, it could have come from Mom or my grandmother (she of the yummy recipes, many of which you’ve seen here) or it could have come from Fanny Farmer.  Regardless of where it came from, it is now mine, and here’s how to do it.

In the bowl of your KitchenAid, drop two sticks (1 cup) of room-temperature butter (I’m sure the recipe calls for unsalted butter, but I only ever have that around during the holidays, and I don’t find that the salted butter causes any trouble).  While that’s whirring around, add a scant cup of white sugar (I always use a little less than the full cup called for) and a cup of packed brown sugar (I’ve used both light and dark with equal success), then drop in a cup of peanut butter (crunchy or smooth, as suits your tastes).  I have to tell you here that I literally NEVER measure the peanut butter  – it makes an ungodly mess in the measuring cup, and I’m always up for a little more than a little less, so I just scoop a big old blop of the stuff out of the jar and drop it in (if you’re good with cookie batters, you’ll be able to judge whether or not you need more flour once you get to that step).  Once all that is creamed together, drop in two eggs, one at a time, mixing until they’re well incorporated.

In a separate bowl, sift together 2 and a half cups of flour (you can add more, a tablespoon or so at a time, if you find you need it later), a teaspoon and a half of baking soda, a teaspoon of baking powder, and a pinch of salt (which you can omit if you’re using salted butter, but I think the salty and sweet mix well in this recipe, so I always throw some in).  With the mixer on low, stir the flour into the butter mixture until it’s well mixed.  Dig the paddle out of the batter, give the lump a few turns with a stout wooden spoon (the KitchenAid almost always leaves some flour at the bottom of the bowl) then cover it all in tin foil and stash it in the fridge for at least an hour.

When you’re ready to bake, preheat the oven to 350° and set the racks in the middle (you needn’t treat the pans you’re going to use; there’s so much butter – and oil from the peanut butter –  in these cookies that they won’t stick).  The traditional way of making peanut butter cookies is to scoop out a bit of dough, roll it into a ball, flatten it with the bottom of a drinking glass, and make little cross hatches in the top with a fork.  You can certainly DO that, but I don’t bother; I find that the flat cookies (rolled out and flattened with the palm of my hand) are just fine.  Cook them until they’re just starting to brown; I found that pretty generous cookies took about 14 minutes in my convection oven.

I also have some fun with these; sometimes, I make them in muffin cups, pressing the dough into the cups and making sure that there’s a slight indent in each cookie (bake these for about the same amount of time – 14-16 minutes should do it).  When they’re cool, I pop them out and fill the dents with all KINDS of yummy things – jam, hot fudge sauce (we prefer Mrs. Richardson’s), Nutella or, Beanie’s favorite, marshmallow Fluff.  In fact, my coworkers are getting peanut butter-and-insert-filling-here cups for sweeties at staff meeting tomorrow; I’ll post a picture when they’re ready (I wait until the last minute to fill them, but I baked these yesterday; they keep like a dream covered and at room temperature).

Enjoy!

Strawberry Jam Muffins

March 20, 2010

Good Lord!  I’ve not posted here since just after Thanksgiving!  Yikes!

I assure you that I’ve not been eating out all this time.  In fact, there’s been quite a lot of activity in the Chili kitchen, though most of it has been in the form of recipes that are trusted favorites; I don’t tend to go in for fussy or fancy during the dark, cold days of winter.

I’ve baked a lot of muffins, and when I say a lot, I mean it; we had a three day power outage last month that melted damned near everything in my freezer, so I baked four dozen muffins in one day – blueberry and rhubarb-pecan – with the fruit I couldn’t re-freeze.  One of my colleagues ran an experiment in his science class to see if he could turn some students orange by feeding them an excess of carrots and sweet potatoes, and I told him that, if he had any carrots left over when the experiment was finished, I’d bake carrot cake for him (I’m pretty sure he made certain that he had carrots left over, but that’s beside the point.  Oh, and a side note; none of the kids actually changed color, much to our collective disappointment).

Despite the unapologetic yumminess of my usual muffin suspects, though, I do get tired of the same recipes over and over, so I decided to branch out a bit.  I have (well, make that had…) several jars of homemade strawberry jam in my basement, and strawberries were starting to make an appearance in the produce section of my market, so I went online looking to see if I could find something yummy and muffin-like to make with them.

I found it.

My original source is here, but I found this recipe in several other spots around the ‘net, too.  Do with that information what you will.  I find this recipe so easy that I’m transcribing it from memory; I think it’s going to become a staple in our household.

Set your oven to 350° and prepare your pans of choice.  I’ve made these both as loaves and as cupcakes with equal success, so the delivery system is really up to you.  Regardless, make sure you’ve got some sort of physical barrier between your batter and your pans,  because this recipe WILL stick.  I used parchment paper in the loaf pans (you’ll need two) and cupcake papers in the muffin tins (this will make two dozen very generous muffins).  The original recipe calls for waxed paper in the pans, but I despise the stuff (I think it makes everything taste like crayons).  Again, go with your own preferences and prejudices.

In the bowl of your stand mixer, cream together two sticks of butter, a cup and a half of sugar (I use less – a tiny bit more than a cup; probably a cup and a scant quarter) and four eggs.  While that’s blending, sift together three cups of flour, 1/2 of a teaspoon of baking soda, and 3/4 of a teaspoon of cream of tartar (don’t ask me why I had this stuff in my spice drawers, but I did.  It’s easy enough to come by – I never have trouble finding it in the market – but I find I rarely use it).  Set that aside, then mix together a cup each of sour cream (I use low-fat) and strawberry jam.

With the mixer on low speed, alternate adding flour and the jam mixture until it’s all incorporated (don’t over-mix).  Here’s where I mess with the recipe a bit; I’ll fold in, by hand, another half-cup of jam and a dozen or so cut, fresh strawberries.  Scoop or scrape your batter into the pans of your choice and park them in the center of your oven.  I found that the loaves took about an hour to bake and the cupcakes were done after about 30 minutes; the toothpick test is a reliable indicator of when they’re ready.

Since I’ve started making carrot cake on a regular basis, I’ve rediscovered my love of cream cheese frosting, and this recipe is another glorious excuse to make the stuff.  A package of cream cheese (again, I use low-fat), half a stick of butter, a good splosh of vanilla, and as much powdered sugar as suits your taste all creamed together and you’re in business.  I don’t think this NEEDS the frosting, mind you – I ate the results of the first attempt with this recipe completely naked (the bread, not me!) and it was perfectly acceptable.  The icing is, well, icing.

Enjoy!

Carrot Cake

April 27, 2009

I love how we kid ourselves.

My mother is very ill and, as a consequence of that illness, is averse to eating.  My grandmother, Goddess love her, put this recipe together for Mom thinking, no doubt, that it would be both pleasing and nutritionally dense.

She’s got it half right.

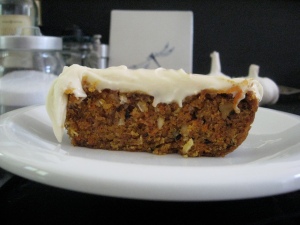
Truly, this is a glorious recipe.  The cake is heavy and satisfying and the frosting is sweet and light, but any hope one might have of gaining real nutritional benefit from the vegetables in the recipe is entirely negated by the fact that its base consists of two cups of sugar and a cup and a half of oil.

Seriously.

Start with the aforementioned two cups of sugar and a cup and a half of vegetable oil, add four eggs, and mix well.  Sift together 2 cups of flour, 1 teaspoon each of cinnamon and salt, and 2 teaspoons of baking soda, then incorporate that into the sugar mixture (you may want to employ a stout wooden spoon for this; it’s a hearty batter that’s going to get heartier in a second).  To this, add in 3 cups of shredded carrots, a cup of shredded coconut, and 1/2 cup walnuts (more or less, depending on your preference.  I pounded them into tiny pieces, but you decide how big you want your bits to be.  I was also thinking, as I wrote this, that pecan pieces might be a lovely alternative to the walnuts…).

My grandmother’s recipe calls for baking the mix in a 9×13 pans at 350° for 45 minutes, but I baked 24 muffins and still had enough batter left over for a small cake.  I really didn’t pay much attention to the baking time (sorry about that!) but the toothpick test is reliable for this application.

The cream cheese frosting is the real reason that most of us eat carrot cake (it’s okay; you can admit it).  I monkeyed quite a bit with that part of the recipe, though I’m not sure I did it any real improvement.  My grandmother says to mix 1 3-ounce package of cream cheese with half a stick of butter and a teaspoon of vanilla, and add powdered sugar until it’s of spreading consistency.  I had an 8-ounce package of low-fat cream cheese and, since my math skills are abysmal on a good day, I winged it.  I put in a whole stick of butter (because 8 is more than 2×3, right?), a big blop of vanilla, a slightly bigger blop of whipping cream, and Goddess only knows how much powdered sugar.  My version came out more like icing than frosting, but it’s still exceedingly yummy.

I kid myself that it’s perfectly acceptable to eat this for breakfast, and the girls consider it a “healthy” after school snack.  Regardless of how healthy it may or may not be, it sure is tasty!

img_29291

Enjoy!