Pudding (and Pie)

November 12, 2021

I’m not a big fan of holiday desserts. Apple pie? Fine; I can take it or leave it, but pumpkin, mince, pecan? Meh. I don’t love any of them. I think it echoes back to my ambivalence to spice cake; desserts that rely on things like cinnamon and mace and clove for the bulk of their flavor just don’t ring my bell.

Chocolate, though? Give it ALL to me.

Now, you all know by now that I am not a culinary snob. If something is easier – and, this is the standard, so pay attention – just as good out of a box as it is from scratch, then have at it. If, however, something is *just* as easy – or is in any way better – than what you can get out of a box, then it’s worth it to you to make that thing from scratch.

Chocolate pudding is one of those things.

I use this recipe for everything, whether my husband has a hankering for warm pudding for dessert on a cold night or I’m tasked with bringing some sort of dessert (that I’ll want to have) to a holiday meal. It’s just as quick as the cook and serve box pudding mix and, I think, several levels better (and there’s just no competition between this recipe and instant pudding; who even eats that stuff, anyway?).

Here’s how you do it:

In a medium saucepan, mix together 1/3 cup of unsweetened cocoa powder, 1/4 cup of cornstarch and 1 and 2/3 cups water. Don’t worry if it’s a little lumpy. Put that over medium-low heat while you open a 14-ounce can of sweetened condensed milk and separate the yolks from 3 eggs.

Whisk the egg yolks and the sweetened milk into the cocoa/cornstarch mixture and bump the heat up to medium (be patient here; trust me). Cook that, stirring pretty much constantly, until it starts to thicken. Whisk briskly for about another minute, then take it off the heat and stir in 2 tablespoons of softened butter, 1 teaspoon of vanilla (but you know how I feel about measuring vanilla) and 1/2 teaspoon of espresso powder, but I never have that so, instead, I stir in a handful of dark chocolate chips (or chunks, depending on what I’ve got).

From here, you’re free to do with this whatever you want. I run it through a strainer and then pour it into bowls and serve warm with a splash of heavy cream for dessert or settle it gently into a vanilla cookie crumb and butter crust and chill in the fridge (or the garage; I usually make this as pie during the winter months, anyway) for pie.

You’re welcome.
Rhubarb Cake

May 22, 2016

I’m a fan of rhubarb.  It grows like a weed in my back yard with exactly zero attention or intervention from me whatsoever (in fact, it grows so well and so quickly that, this year, I’ve discovered several stalks that were literally split because they grew so rapidly.  I swear, if I went out into the yard and sat very still and quiet, I could probably hear the stuff growing).  I also have an affinity for it because it reminds me of Gramma Charlene; my whole rhubarb patch is due entirely to her.  One late spring afternoon, she was in HER rhubarb patch, cutting and pulling stalks for me.  She yanked one a little too hard and it came up with some roots still attached.  “Stick this in the ground,” she told me, with no pretense or artifice, “It’ll grow.”

And grow, it has.  Gloriously, generously, and enthusiastically.

My customary application of rhubarb is in Sister Frances’s rhubarb pecan bread.  I’ve also made a fantastic rhubarb compote (put a pound or so, diced, and a cup or so of sugar (and, if you have one, a vanilla bean, split and scraped) in a saucepan or your crock pot and simmer until it’s all soft and squishy.  Mash it about with the back of a spoon or a potato masher.  It’s particularly good as a topping for either ice cream or yogurt, but it also serves very nicely heated and spread on French toast).  The bumper nature of the annual crop, though, means that I am always seeking out new recipes to use the stuff, and this one’s a winner.  It’s a variation on Gramma’s fruit bread recipe, though I’ve modified things a bit.

To start, preheat your oven to 350°, butter a loaf pan, and line it with parchment (which you will also butter).  I use two pieces to make it easier; one lengthwise and one across, which makes a nice sling if you want to lift the loaf out.  I don’t, but we’ll talk about that later).  Cut little logs of rhubarb to fit all along the bottom of your pan (or, alternately, you can just dump chunks in there.  I like the look of the logs, but the flavor of the dish won’t be changed if you don’t want to get that fussy).  Sprinkle 4 or 5 tablespoons of white sugar over the rhubarb and let it sit for a few hours, until it starts releasing its juice.

In the bowl of your Kitchenaid, beat a stick and 4 tablespoons of room temperature butter with a cup of sugar until it’s light and fluffy.  To that, add three room temperature eggs, one at a time, until the whole is combined and airy.  In a separate bowl, sift together a cup of flour with a teaspoon of baking powder and a 1/4 teaspoon of baking soda, then stir that into the batter, alternating with 3/4 of a cup of either room temperature sour cream or yogurt (either works well in this application, though I most often have yogurt to hand).  If you like, you can stir in a blop of vanilla extract just before you pour the batter over the rhubarb (I like, so I do).

Park the pan in the middle of your oven and bake for about 40 minutes or so (you may want to put a layer of foil or something under the pan; the few times I’ve made this, sugary rhubarb juice has leaked up the corners of the pan and dripped on the floor of the oven.  This makes a fair bit of smoke and can be tough to clean up if you don’t have an oven liner).  The toothpick test is effective here.

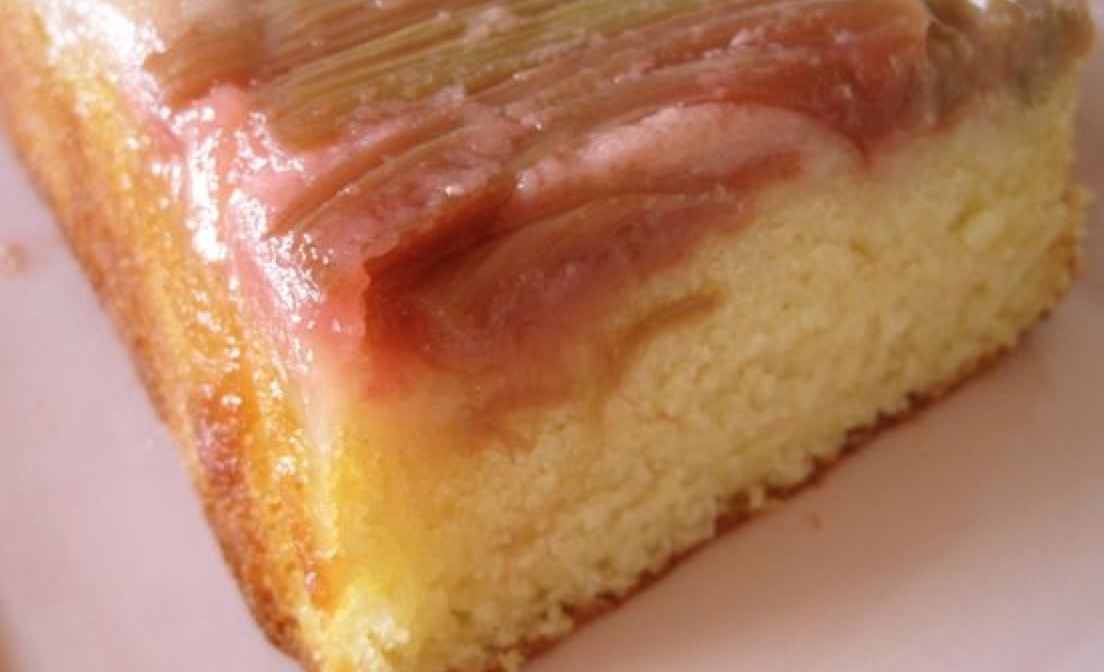
I let the cake cool for a bit on the pulled-out oven rack or on a trivet on the counter, then I’ll invert it on to a pretty plate while it’s still warm but no longer rocket hot.  It really is best served as an “upside down” cake, because the rhubarb turns all kinds of pretty, springtime shades of pink and green, and some of the juice will leak down into the cake.  You may, if you like, sprinkle a bit of sugar (white or confectioners) over the top, but I think that’s overkill; it’s delicious just as it is.

Screen Shot 2016-05-22 at 4.36.07 PM

Tropical Grandma

March 7, 2016

A long time ago, I told you about this go-to recipe for quick bread that my grandmother gave to me.  I’ve made it with blueberries, raspberries, rhubarb, strawberries – pretty much everything – and it has never let me down.

Citrus is in season right about now, and my local farm stand/store had an obscene sale on lemons and limes this week – I’m talking whole bags with five or six pieces of fruit in them for a dollar.  I couldn’t resist, so I bought a bag of each.

Now, lemons?  I know what to do with lemons.  I’ve got a couple of killer recipes for chicken, pasta, and rice that make nice use of lemons, not to mention that I’m trying to get into the habit of having a cup of hot water with lemon and a bit of honey every morning, so I’m good with the lemons.  Limes, though?  I’ve never really interacted much with limes, but I had a whole bag of ’em, so I got to thinking.

Every Sunday night since I started teaching at this new school, I’ve baked something to leave in the teacher’s room for my colleagues.  Last week, I decided to try to modify Grandma Charlene’s recipe for use with the limes.  I had five limes and wanted to end up with enough finished product to have one loaf to bring to work and one to leave at home (my family gets cranky when I make sweeties that they can’t share), so I tinkered a bit with the recipe.  I was so delighted with the end result that my coworkers are getting lime bread again tomorrow, too.  Here’s how you do it:

In to bowl of your KitchenAid (really, use a stand mixer for this; it makes putting the recipe together SO much easier than trying to use a hand mixer… or mixing it by hand… yikes!), drop in a stick and a little less than a half of softened butter (about 2/3 of a cup, I guess; I don’t know because I eyeballed that part) and 2 cups of white sugar.  While these are busy creaming together, grate the zest off of two limes and squeeze as much juice out of them as you can (it probably won’t be much; while I always associated lemons and limes, they’re really very differently textured).  Once the butter and sugar are nice and fluffy, scrape in the lime zest and pour in about 2 tablespoons of the juice (save the rest for the glaze).  Leave that to keep spinning on low while you sift together 3 cups of flour, 3 teaspoons of baking powder, and a teaspoon of salt, then pour yourself a cup of milk in a separate container.  Crack four eggs, one at a time, into the still-stirring mixer.  Once everything is all nice and smooth, spoon in half the flour mixture, then pour in half the milk, then do that over again until it’s all nicely mixed (at this point, you may want to stop the mixer and give the sides of the bowl a scrape; I always end up with a thin layer of butter around the edges of my bowl).

Grease two standard loaf pans, pour half the mixture into each, and park them in the middle of a 350° oven for about an hour (or as long as it takes a for a positive toothpick test).  Let them cool in the pans for about 10 minutes, then run a knife around the edges and turn them out onto a rack to finish cooling.  Slice the loaves before you glaze them… trust me on this…

To make the glaze, pour the remaining lime juice into about a cup of confectioner’s sugar and stir it about until it’s nice and smooth (you may need to add more sugar or a bit of water, depending on the consistency you want).  You can eat this warm from the oven, but I find that, unlike this recipe done with summer fruits, I prefer this version cold.  Either way, though, it’s a winner recipe.

Solstice Love

December 21, 2015

I grew up in an abusive household.  When I was a teenager, I was essentially adopted by my then-boyfriend’s family, and it was there, in the presence of the women of this family – notably my great-grandmother Gramma Grace, her daughter-in-law, my Gramma Charlene, and Mom – that I learned to really love.

Grace died just before I graduated high school.  I lost Mom in 2009, and Gramma Charlene passed in 2011.  One of the legacies that I have of Mom and Charlene in particular is their recipes; I learned to cook some of my favorite things in these women’s kitchens.

Solstice is my big holiday.  As an atheist, I don’t really put much stock in the “holy” days, but Solstice, to me, feels special.  I don’t know whether it’s the ancient quality of the celebrations or the very cool stone circles or because I really love the astronomical implications of the day – when we reach the darkest point and, from here on out, it’s only going to get lighter – but I have always felt that Solstice deserves a special recognition.  We do Christmas in the Chili house because of culture and peer pressure, but I feel like, if I were to have a “holy” day, it would be Solstice.

We celebrate the day by inviting friends-who-are-family to the house for fortifying foods, lots of candle and firelight, and presents.  Every year, though, I trot out this recipe for my Gramma Charlene’s cinnamon rolls.  They’re decadent, positively LOADED with butter, and taste just like her love; warm, sweet, and comforting.

To start, combine 1 cup of warm water, 2 envelopes (or 4 1/2 teaspoons) active dry yeast, and 1 tablespoon of sugar in a bowl.  While that’s getting cozy, mix 1 cup of warm milk, 2/3 cup of sugar, 2/3 cup of softened butter (this can be melted, as well, if you prefer), and 2 lightly beaten eggs in the bowl of your stand mixer fitted with the dough hook.  Add the yeast mixture and stir, then add 3 1/2 cups of flour, one at a time, and continue mixing until everything smooths out.

From there, you’re going to add 4 or 5 more cups of flour; you’ll know the dough is ready when it gets very smooth and pulls away from the sides of the bowl.  Dust a work surface – and your hands – generously with flour, turn the dough out, and knead to your heart’s content; this is a lovely, smooth, delightful dough, and kneading it really is a wonderful exercise.  Add flour – a little at a time – just to keep the dough from sticking to you or the counter.  When it’s all smooth and perfect, plop it in a well-greased bowl, cover it with well-greased cling film, and put it in a warm place to rise.

When it’s doubled (keep an eye on it; I made the mistake of leaving the house for a bit while my batch was rising and it escaped the bowl!), turn it out again onto a well-dusted work surface and press or roll it into a large rectangle.  Brush the surface with 1/2 cup of well-softened or melted butter, then sprinkle over 1 1/2 cups of sugar mixed with 3 tablespoons of cinnamon.  Here, if you like, you can add the nuts of you preference and/or raisins, but my family prefers straight cinnamon-sugar.

Roll the dough into as tight a roll as you can manage, then crimp the edges and lay the thing on a cutting board.  Grease a couple of 9×13 glass pans very well and sprinkle over that any cinnamon sugar mixture you may have leftover (I always have leftovers).  Using a serrated knife, cut your rolls and lay them, edges touching, in your pans.

From here, I stash the pans in the fridge (or, more often as not, in the garage) overnight.  When you’re ready to bake them, pop them in a preheated, 350° oven for between 25 and 30 minutes – watch them carefully because the bottoms WILL burn if you look away too long.

Let them cool a bit, then glaze them with 4 cups of powdered sugar mixed with 2/3 cup melted butter and as much vanilla extract as you like, finding the perfect consistency with a little hot water (I usually use about 1/4 cup).

Really; make these.  As you take your first, glorious bite, send a little good energy into the Universe on behalf of my Gramma Charlene; she of the big heart and generous kitchen.

10565117_10152577658684885_8609641077383833956_n

Hot Chocolate

January 11, 2015

Oh, DEAR!

So, I’ve been trying to find a recipe for the perfect hot chocolate.  I’ve LONG since outgrown a love of powders a’la Swiss Miss.  A few years ago, I found a recipe for a concoction that Starbucks put out called a chantico, which was delicious, but a little too rich for regular consumption.  There’s a recipe that seems to be a staple on Pinterest that looks divine; it involves Nutella (YAY!) but takes at least two hours to cook (BOO!).  My brother posted a video with a recipe for Italian hot chocolate on his facebook wall the other day, and while it looked delicious, the consistency looked like it required a spoon, it was at LEAST 20 minutes in the making, and it required a level of fussiness that I wasn’t sure I’d be able to muster when the need struck.

Periodically, I get cases of what I call “the chillies” (which is different from The Chilis, and you know it…).  Sometimes, and I have no idea why, I just get cold and can’t seem to warm up.  I came down with one yesterday.  My usual method of combating a case is to take a long, hot shower, but it was the middle of the day and I’d showered once already.  I hunkered down under a pile of blankets in the family room and was in the process of pulling the blankets up to my nose when my beloved husband looked over, saw what was wrong, and said, “hold on a second; I’ve got something that might help…”

Now, you might think that he was being dirty (and that WOULD have warmed me up, I’m sure!) but no; he disappeared into the kitchen.  I heard the sound of the microwave and the smoothie maker, and a couple of minutes later, he was presenting me with a mug of some of the best hot chocolate I’ve ever had.  When I got to the bottom of the mug, I finally had the sense enough to ask him how he did it, and it was so stupid-easy that I had to share.

Start with milk in a glass measuring cup.  Pop that in the microwave until it’s good and hot – not quite boiling, but certainly thinking about it.  Drop two or three Lindt Lindor truffles into your mug (no, really!) and pour a little of the hot milk in to get them melting.  Pour the rest of the milk into a blender or smoothie maker (or, if you have one, hit it with a milk frother thingy that people use to make cappuccino), make it all frothy and bubbly, then pour it into the mug with the now nearly-melted Lindt truffles.  Give it a little stir, and revel in the yummy, creamy, chocolatey, two-ingredient,  stupid-easy goodness.

Lindt-Chocolate-Lindor-Truffles-Dark-Chocolate-Balls-Candyimage credit
We ended up taking a trip to our Lindt outlet as soon as I warmed up (which, given that it didn’t get over 22° yesterday, meant that I was chilly again, but the heated seats in my little VW Golf helped ameliorate that), and came back with literal POUNDS of truffles.  The beauty of this recipe is that you can use any flavors – and in any combinations – that you want.  I, personally, like two extra dark chocolate truffles (the ones in the black wrappers), but my daughters have decided that the milk chocolate ones (in the red wrappers) are the way to go.  I’m betting that the salted caramels would be lovely, too, or the peppermint chocolate, if you’re into that sort of thing.

Really; do this.  You will NOT be sorry.

Beef Bourguignon

January 1, 2014

Wow!  It’s been a while since I’ve posted here, huh?  Sorry about that!

I stumbled upon a beautiful recipe when I was looking for a hearty and classy beef stew to serve at my Winter Solstice party, but after a first, trial run, I discovered that it needed a significant amount of tinkering (I’m glad I had that trial run!).  Here’s how I do it.  It’s a little fussier than I usually go in for, but it’s TOTALLY worth it; trust me.

Start by cooking a few slices of thick bacon in a deep, wide pan.  I usually go with four slices, because that’s what fits in the bottom of my pan, and cook the rest in the oven to snack on while I get on with the rest of the recipe.  Once the bacon is crispy, transfer it to paper towels and let it drain, then dump two thinly sliced onions (I love my mandoline slicer!) into the bacon leavings and cook them over medium-low heat until they turn soft and slightly caramelize.  Just before they’re done, drop in a few cloves’ worth of chopped garlic, making sure that the garlic doesn’t burn.  Fish the onions and garlic out of the pan and transfer them to the bottom of a crock pot.

While that’s going, prepare your stew beef.  Make sure all the chunks are about evenly sized and lay them out on paper towels to dry.  Sprinkle them with a little salt and pepper, then brown the meat in batches and transfer it to the crock pot, too.

The original recipe called for a half cup of cognac, but since I don’t keep cognac in the house, I use a half cup of good Scotch.  Pour it in with the last batch of the beef and use it to deglaze the pan, then light that puppy on fire (watch your eyebrows!).  Once the flames die down, pour what’s in the pan into the crock pot.

Into the crock pot, dice or crumble the bacon, drop in a small can of tomato paste, a couple cups of baby carrots, and a bag of frozen pearl onions, and cover the whole thing with a bottle of the red wine of your choice (I use pinot noir, but whatever you really like is fine).  If you find you need more liquid (I never do), top it off with some beef broth.  Stir it around to distribute the tomato paste and the vegetables, pop on the lid, crank your crock pot to high, and leave it alone all afternoon.

About ten minutes before you’re ready to eat, clean and quarter a bunch of white mushrooms and sautee them in butter; you can add these to the stew at the end or, as we do in my family, allow those who like mushrooms to scoop some into their bowls.  My usual vehicle for this yumminess is toasted rustic bread spread with a little roasted garlic paste, but it would be fabulous over polenta or coarsely mashed red potatoes, or even rice (or in a bowl all on its own).  It reheats beautifully and makes a really nice lunch a few days later; this is a dish that could even be prepared the day before you need it.

Enjoy!

Heavenly Rolls

December 30, 2012

I love Chef John from foodwishes.com.  He makes fussy recipes seem easy; he’s got a laid-back demeanor and he just sounds like a wonderful guy.  Watching his videos is spirit-boosting; he comes across like someone who, if you were sharing a kitchen with him, would make you feel competent and confident; he never gives me the impression that he could be condescending or harsh.

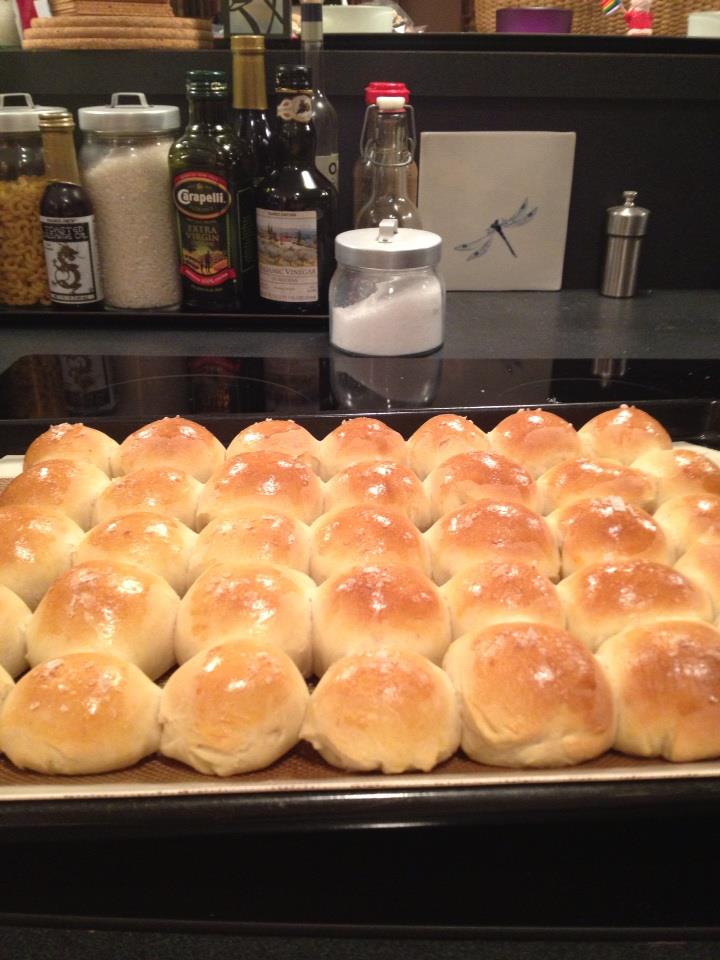
I found a recipe for King Arthur Flour pull-apart rolls just before Christmas, and I thought that I’d put together a batch for our feast.  The day before the holiday, I remembered that I’d seen Chef John post a video for a similar recipe earlier in the month, so I went back through his archives and found it.

524953_10151315418494885_1672472674_n

I compared the recipes and decided that I liked Chef John’s better, so I busted out the KitchenAid and got to it.  It was stupid-easy and the results were sublime.  I doctored the recipe a bit, which is another thing I love about Chef John; he’s perfectly okay with your mucking about with his recipes; if you don’t like something, sub it out for something you do like.  It’s okay; it’s all good.

Here’s how I worked the recipe on Christmas – and again this afternoon, though today I’m making loaves instead of rolls.  I can’t recommend this recipe enough; it really is delightful.

Start with 2 and a quarter teaspoons of active dry yeast in the bowl of your KitchenAid fitted with the dough hook.  To that, add a quarter cup of warm water and let that sit while you melt a half a stick of butter in a cup of milk (Chef John does this in a little saucepan; I do it in a Pyrex measure in the microwave).  Pour the resultant slurry into the yeast, squeeze in a tablespoon or so of honey (or of sugar; your choice, and how much you put in is entirely up to you), a good teaspoon of salt (I just grab a big pinch), and – here’s where *I* think the magic happens – a good, heaping blop of roasted garlic paste.  I shake in some dried oregano, then scoop out two cups of flour and turn the machine on low.

Once that gets going, start adding flour, a little bit at a time, until the dough started to pull away from the sides of the bowl.  From there, let the machine spin for another 5 minutes or so (that’s the stupid-easy part; there’s literally no hands-on work to this recipe).  Once that’s done, free your dough hook and hold the ball out while you drop a little olive oil into the bowl, then swish the dough around in the oil until it’s well-coated.  Cover the bowl in plastic wrap and let it sit in a warm spot for an hour or so or until it’s doubled in size.

From there, turn the dough onto a board (DON’T flour it; you won’t be working the dough very much and the oil from the rising should be sufficient to keep it from sticking to everything) and shape it as you will.  I made little pull-apart balls for Christmas, but this afternoon’s treatment involved my patting it out into a rectangle, spreading a little more garlic paste onto the top, and jelly-rolling it into a loaf that went onto a silpat-lined cookie sheet.  Paint the bread with an egg beaten with a little bit of water and sprinkle of something – sea salt, garlic salt, parmesan cheese, herbs; whatever makes you happy.  Back into the warm spot it goes for another half hour or so, or until it re-rises.

Take the bread out of your oven if you’re using it as a proofing box, and then crank it up to 375°.  Park the bread in the oven and figure out how long it’ll need to cook; little rolls get about 20 minutes; a larger loaf may need twice that (I test by temperature; pop the bread out of the oven and stick a thermometer in its underbelly; if you’ve got 200°, you’re in business).

Really; Enjoy!

Breakfast Cookies

November 18, 2012

Here’s the thing; I don’t like to eat breakfast.

Don’t get me wrong; I LOVE breakfast food.  I mean, come on; bacon!  Hello?  French toast, waffles, hash browns, scrambled eggs, omelets; there’s really very little about breakfast food that doesn’t appeal to me.  My problem with it, though, is that its served so early in the morning.  If I can eat breakfast at 10 am, that would suit me just fine.

I shouldn’t wait that long to eat, though, and because I’m trying both to be healthier and to set a better example for my daughters, the quest to find something that I’m willing to stomach in the wee hours took on some serious focus a few months ago.

I went looking for some form of baked oatmeal – something that could be made ahead and stored (to eliminate the “I don’t feel like making anything” excuse) and which could be eaten on the go (because, while I personally don’t have a whole lot of time constraints in the mornings, my daughters do not always rise early enough to allow themselves leisurely mornings).  After messing with a couple of different recipes, I’ve managed to Frankenstein together something that I really like.

Start with half a cup each of honey, peanut butter (I use smooth and all-natural, but whatever you like is perfectly acceptable) and apple sauce (you can sub bananas for the apple sauce, but I’m not a big banana fan, so I don’t).  I drop in a blop of vanilla here, just because I can.  Mix these together in a large-ish bowl until they’re well combined.

Into that, drop a cup of old-fashioned oats, half a cup of flour (I use whole wheat white flour for this application), a quarter cup of dry milk powder, and  a quarter teaspoon of baking soda (you can sift these things together if you’re fussy enough to need to do that, or if your milk powder is lumpy).

After that, the world, as they say, is your oyster; add in whatever suits your fancy.  Like nuts?  Drop some in there!  Cinnamon and nutmeg?  Why the hell not?  If you’re a raisin kind of person, I say have at it.  My personal preference is for a handful each of chocolate chips and dried cherries, but that’s just me.

Drop the batter in generous lumps  – like, a quarter of a cup – onto a baking sheet lined with parchment (or silpat; I love that stuff) and park the pans in a 350° oven for about 10-15 minutes; you want them cooked, but not dry.  Let them cool, pop ’em in an airtight container, and keep ’em on your counter.  One of these and a nice glass of milk should hold you over until lunch (and they make completely acceptable after-school snacks, too).

Enjoy!

(pictures to follow…)

Quinoa Bites

August 21, 2012

I found this recipe on Pinterest.

If you’re not familiar with Pinterest, it is pretty much the brainchild of Satan.  It’s a place where people (mostly women with too much time on their hands) go to “pin” things that they find on the internet.  These things can be arranged into “boards” according to the individual’s needs, and people (eherm… Me…) can lose hours – HOURS, I tell you! – surfing the site (and if you’re not careful, you’ll leave a session with Pinterest feeling like you’re completely inadequate).

There are a lot of really great things on Pinterest, but you’ve GOT to be choosy because there’s also a LOT of crap.  The problem is that it ALL looks gorgeous, so weeding out the winners from the clunkers is often a matter of actually trying it yourself.

I found a winner.

The original recipe is here.  I’m rendering it here as I will modify it next time.

Start with a cup of quinoa and cook that in whatever way you do.  If you don’t know how to cook quinoa, the process is sort of a mix between rice and couscous; take an amount of quinoa and double that amount for the liquid – I often use chicken broth, but any liquid works just fine (including milk!) – and bring it to a boil.  Simmer for about 10 minutes, then fluff the stuff with a fork.  My favorite cooking process is in the rice cooker – dump everything in, push the button, and you’re in business.

While the quinoa is cooking, combine about a cup of grated parmesan, 3 eggs, 3 tablespoons of flour, a cup of shredded carrots, a good handful of chopped green onion, and as much minced garlic as suits your taste.  I’m going to include a dash of garlic salt and perhaps some mushrooms and chopped yellow onion the next time I put these together; I found them to be a tiny bit bland.

Mix everything together (I didn’t bother to cool the quinoa first – it went from rice cooker to mixing bowl with little ill effect) and spoon the mixture into muffin cups – oh; and unless you’re using silicone muffin tins (which I would HIGHLY recommend), make sure you oil them well or you’ll never get the bites out.  Next time I make these, I’m going to sprinkle some cheese in the cups before I put the mixture in, but I’m using silicone muffin pans, so I can do that.  Sprinkle cheese on top and pop them into a preheated 350° oven for about half an hour.  I ended up turning the broiler on over them for the last little bit, just to crisp up the cheese on top, but in terms of aesthetics, it didn’t matter because I finished them off with a swath of tomato sauce and served them with a green salad.  Mr. Chili, Bean, and I LOVED them (Punk was babysitting and didn’t eat dinner with us tonight).  These are absolutely going into the Chili Family dinner rotation.

Oh yum, indeed!

image credit

Nutella Bread Pudding

August 17, 2012

We invited the gentleman who owns the cottages we rent at the lake to dinner last night.  At Mr. Chili’s request, I put together a recipe of lemon chicken picatta (which turned out particularly lovely), but I was stumped over what to make for dessert.

It’s summertime, and that usually means fruit or ice cream for after-dinner sweeties around here.  I wanted something a bit more impressive, though, and as I mused over the possibilities, my eyes rested on a box of mini croissants and a jar of Nutella sitting on the counter.

Bingo.

Here’s how you do it.  Preheat the oven to 350° and break out a dish – I use a souffle dish, but you can use a loaf pan or a cake pan or pretty much anything that’s of sufficient size for your pudding.  Split croissants (day-old or older is better; I’d bought this box on Monday and cooked the pudding on Thursday) and slather them with a generous swath of Nutella and put the tops back on.  Once you’ve got them all sandwiched together, cut them into chunks – my mini croissants worked perfectly cut into halves; I would imagine that standard sized pastries would need to be cut into thirds or quarters – and arrange them in the dish, jigsaw-puzzle wise.

In another container (I use my measuring cup), whisk a half cup of powdered sugar with a cup of cream (the original recipe calls for heavy cream, but I almost never have that to hand; I have perfect success with half and half), two eggs, and a healthy shot of vanilla.  Pour this over the croissants and let the whole thing sit for about half an hour.  I cover the top in parchment, then put on a layer of foil and put something moderately heavy over the whole, just to encourage the little sandwiches’ soaking up the liquid.

When you’re ready to bake, cover the dish in foil and park it in the oven for about half an hour, then take off the foil and let it go another ten minutes.  I leave the pudding to cool on the counter for about 20 minutes before I serve it; you want it warm, but not rocket hot.

This is gorgeous just as it is, but it doesn’t suffer one bit from a splash of cream.  Nor, I imagine, would a scoop of ice cream or a splot of whipped cream go amiss, either.  During the holidays, I swap out the cream with vanilla egg nog (leave out the sugar if you do this; you won’t need it) and it’s perfect.

You’re welcome.